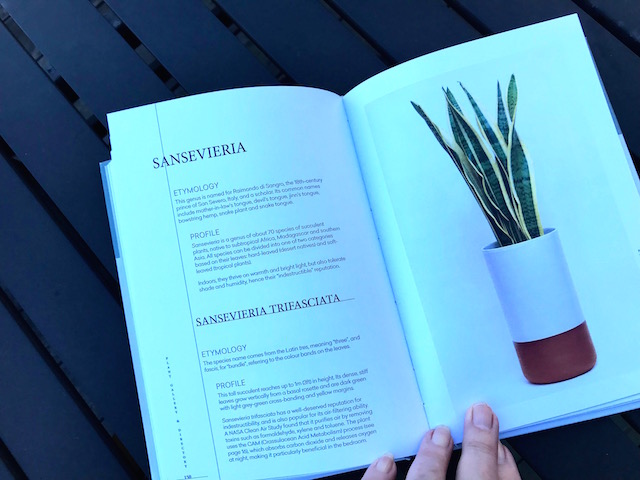
Growing-January

Food
• Artichokes
• Arugula
• Beets
• Carrots
• Garlic
• Chard
• Lettuce
• Limes
• Rhubarb

Herbs
• Chives
• Mint
• Parsley
• Thyme
• Oregano
• Sage

Blooming-January

• Gaillardia
• Ivy geranium
• Jasmine
• Lavender
• Nasturtium
• Potato vine (white)
• Rock Rose (pink, white)
• Rosemary
• Roses (still blooming)
• Society garlic
• Sweet Pea Bush

Harvesting-January

• Limes
• Arugala
• Tendergreen Mustard Spinach
• Beet greens

Growing Rhubarb Along the Coast

Stems of rhubarb are edible

I’m looking around my garden to see what needs to be done, what worked this past year, and what didn’t. The rhubarb looks really healthy and I’ve harvested it for months. What works for me, may just work for you.

January is a perfect time of year for planting rhubarb from dormant roots or plant divisions. You can buy them or ask a fellow gardener to break off a healthy crown bud for you. I started from one plant from a friend’s garden and it has thrived here.

Rhubarb is a native of Siberia. Because our winters are not cold enough to produce bright red stems, you have to be content with the reddish tint of our coastal climate rhubarb. One plant will take up 3-4 feet of garden space in a sunny or partially shaded area. One plant is probably enough for a household, although two may provide enough to give away. Prepare the soil well before planting, digging in lots of compost, and fertilize each fall with manure. Space your new plants about 3 feet apart and place the crown just below the top of the soil. Cover with mulch and watch the magic begin!

The best rhubarb is harvested just after the leaves open and before they are completely flat. To harvest, pull or twist stems gently from lower part of the plant. Cutting stems with scissors or a knife leaves a stub that may cause rot. Leave some of the stalks on the rhubarb plant, even if your neighbor tries to get you to harvest them. The plant needs to feed itself with the remaining leaves.

Rhubarb Grows Among the Flowers

Leaves  of rhubarb are toxic and most critters won’t touch them. Even our pesky labradoodles, who love to eat greens in the garden, don’t chew on them. The leaves contain oxalic acid. Oxalic acid is also in spinach, beets, cabbage, and other vegetables but to a lessor degree. So take my word for it. Don’t eat rhubarb leaves.

Rhubarb has few problems with pests and diseases. Bugs do not care for rhubarb leaves but occasionally a snail or slug will take out of bite out of a stem. This is seldom a problem for the plant. Just go out after dark with a flashlight and find the culprit. I did lose a rhubarb crown last year in the wet winter. The Phytophthora fungus was most likely the cause due to poor drainage in that area of my garden.

In culinary use, fresh stalks can be eaten raw and in fresh fruit salads. Be forewarned, they are oh so tart! Most commonly, they are used in desserts and sauces with lots of sugar. Next time I make an apple/rhubarb crisp I’ll post the recipe. Rhubarb adds some tartness to my sweet apples and the blend of sweet and sour is delicious.


A Sustainable Year in the Garden

Australian Plants are Drought Tolerant

I wrote some garden resolutions a few years ago for our local newspaper and the ones regarding sustainability are still relevent. We hear the word “sustainable” referring to buying food grown close to home, using less energy, and generally, demanding less of the environment in our daily life. Sustainability is not a new concept. In the 60’s many of my generation gave up luxuries for a more natural existence. My family had a milk goat and I baked all our bread. Decades before us, people had victory gardens and did what they could to survive a depression and world wars. While maturity has increased my appreciation for “creature comforts”, I still look for ways to “live more lightly” on the planet.

In 2012, I am going to make my garden more sustainable and less labor intensive. I know, I say that every year,  but this time I mean it! I want to make it more drought-tolerant and more naturally beautiful. I want to grow food but not so much as to be wasteful and to make my life more difficult.

Our hens have played a large role in helping us be sustainable. They supply us with fresh eggs and their fertilizer keeps our compost bins cookin’. No kitchen scrap goes to waste. What the chickens don’t eat, the worms in my worm bins process, providing me with “black gold” (food for plants).

I make garden resolutions each year, which really means that I think about how to improve my immediate environment. These are my garden resolutions for the coming year. As you can see, they have a “sustainable” twist.


    • I will continue to replace “cottage garden” plants with “drought tolerant” plants.
    • I will use my vegetable beds year-round by practicing successive plantings of lettuce, arugula, and winter greens. I will continue to experiment with cool season vegetables.
    • I will use potted plants for seasonal color rather than planting entire beds of labor-intensive plants. This one is hard for me as I love color.
    • I will compost all garden clippings except those with diseases (which sadly, amounts to a large percentage).
    • I will remember to turn my compost pile to speed up decomposition.
    • With every planting, I will improve the soil with composted materials (and the earthworms will love me for it).
Wishing you an abundant and sustainable New Year and may the joy of gardening live in us every day!

Rain Chains – A Beautiful Way to Collect Water

Rain chain and a pot full of rainwater.

We’ve had some lovely light rain this fall. Our large water storage tank (1600 gallons) collects rain from the rooftop of the garage and is about half full. The pot that collects rain from the garden shed has been filled and emptied several times over the last month. I use the water from this pretty pot to water indoor plants.

I water indoor plants about once a week. Some of these are sensitive to the salts in tap water. If you see a Spathephyllum (Peace Lily) with brown leaf tips, it is most likely due to being watered with tap water. Setting up a simple system of gathering rain water can be done in a weekend.

To gather rainwater from a gutter that edges your roof, simply remove the spout and attach a chain or rope to direct the water downward into a can or pot. You don’t have to be fancy. If the location of your downspout isn’t too obvious, any kind of chain or rope will work and a plastic can will hold the water. I wanted something a little more decorative since my garden shed is an integral part of my garden. I got a rough-glazed pot at Old Town Nursery in Nipomo, about an hour south of Cambria. I love that nursery! I ordered the rain chain online. You can get rain chains of all styles and materials. Copper develops a nice patina over time and fits well in garden designs. The rain chain comes with a wire that fits up into the downspout and secures it there.

Rain is really valued here on the Central Coast. There is noting quite so pleasant as to be surprised with a pot full of rainwater after a couple of hours of light rain. It’s like, “Merry Christmas to me”!

Fresh Pumpkin Soup With Sausage

Fresh Pumpkin Soup With Sausage & Cream

I had lots of beautiful pumpkins this year and we intend to eat every one of them! Cooked fresh pumpkin is a real treat; for chickens, dogs, and people. I’ve been told that to settle a dog’s upset stomach, give them a few spoonfuls of cooked pumpkin. It has worked well on our labradoodles after they’ve eaten “god know what” while “free-ranging” in the garden.

I’ve cooked and frozen some pumpkin pulp, but on Sunday, I made a hearty fresh pumpkin soup for guests. I doubled this recipe. The dish was so popular that I had only enough leftover for a bowl at lunch the following day. I’ll just have to make the soup again. Once the pumpkin was baked and pureed, it was simple to put together. If you don’t have fresh pumpkin, canned pumpkin will do and will save you lots of time. Here is the pumpkin soup that was a hit this last week.

Fresh Pumpkin Soup With Sausage

Serves 6

Prepare the fresh pumpkin by removing the seeds and pulp from the center of the pumpkin. Cut it into large pieces and lay the pieces skin-side-down on a baking tray. Drizzle with olive oil and roast for about an hour at 350 degrees or until tender when pierced with a fork. Cool and scrape the peel from the meat of the pumpkin. You can purée  the chunks in a blender with a little chicken broth or mash the pumpkin pieces with a potato masher. The soup will be pureed in the blender before adding the cream.

Pumpkin Cut Into Chunks Ready to Roast

1/2 lb. spicy sausage (I used habanera but andouille or any spicy sausage would work). Remove casing and sauté chunks in 2 Tbls. olive oil.

Add  1 1/2 cups chopped onions and cook until clear (about 10 minutes).

Add 1 tsp. dried thyme and 1 tsp. cinnamon

Add 2 lbs. cooked pumpkin. This is about 4 cups. Canned pumpkin can be used.

Add 1/4 cup maple syrup

Add 6 cups chicken stock

Simmer all for about and hour.

In blender, purée soup in batches so that it doesn’t shoot up out of the blender. Return it to the pan and stir in 1/2 cup cream. Warm but do not boil. Serve immediately or let rest and warm again just before serving.

I served the soup with homemade croutons.

If made the day before, leave cream out until just before serving. The spices will have a chance to

meld.

This soup can be made with sweet potatoes. I intend to try it!

Enjoy!


Planting and Care of Reblooming Irises

'Persian Berry' is One of My Favorites

Bearded Irises grow and bloom really well along the coast. I’m especially fond of the varieties that rebloom and provide color from spring to fall. Irises have thick, fleshy, underground stems (called rhizomes) that store food produced by the sword-shaped leaves. The rhizomes grow best when planted at or slightly below the soil surface with feeder roots penetrating the soil below. When you purchase your Iris rhizome, the feeder roots will be dry. These can be cut off but are best left on to stabilize rhizomes during planting.

Site selection for Reblooming Irises

A full sun exposure is preferred, however, some of the delicate pink and blue Irises hold their color better in partial shade. Good soil drainage is essential to prevent rhizomes from rotting. It may be necessary to plant the rhizomes in raised beds or containers to obtain proper drainage. Clay soil should have organic matter (pine bark, compost) incorporated into it to improve drainage. Deer don’t appreciate Irises so they are considered deer-resistant and do not have to be contained within a fence.

Fertilization of Irises is important to get best results, but must be done in moderation. Nitrogen, potash, and phosphorus are essential for Iris. At planting, incorporate a low-nitrogen fertilizer such as 5-10-10 into soil.

'Autumn Thunder' is Still Blooming in November

Planting Reblooming Irises

It is best to plant Irises in the Fall to allow them to become well established in the winter. Container-grown iris can be planted in the spring. In a well-prepared bed, dig a shallow hole large enough to accommodate the rhizome or clump of rhizomes. Form a mound of soil in the center for the planting base. Make the mound high enough so the top of the rhizome is slightly above soil level. Spread the roots around the mound, fill with soil, and water. For a mass of color, plant at least three rhizomes (spaced 8 to 10 inches apart) or plant undivided clumps; point each fan of leaves away from the center of the group. Clumps should be spaced 18 inches apart.

Care and Maintenance of Irises

Before flowering, water plants often enough to keep the soil moist but not wet. Reblooming Iris should be watered during the summer. After flowers fade, cut flower stalks back to an inch or two above the rhizome to prevent seed formation. Reblooming Iris should be fertilized in the spring as new growth begins and after spring-flowering ends. Irises should not be mulched. In early Fall, cut leaves 6 to 8 inches from the ground.

After 3 to 5 years, Irises generally become crowded and should be divided. Irises can be divided any time, but many growers prefer to divide 4 to 6 weeks after the flowering period. Cut the leaves to one-third their length. Dig the clump and wash soil off with a hose. Separate young rhizomes and store or replant.

Clumps of Irises Bloom Throughout the Garden

Cambria’s Scarecrow and Harvest Festival

Welcome to the Cambria Scarecrow Festival


For the past three years the creative residents of Cambria have put their talents to work to create over 200 stuffed and wired fantastical and real-life creatures to decorate our little village by the sea. Up and down Main Street and along Moonstone Drive you’ll find creatures and lifelike humans that fool you into thinking you are not alone in your meandering through town. This may have nothing to do with gardening as these creatures do little to protect our crops, but they are a welcome diversion from fall clean-up chores. So enjoy the pictures, come to Cambria if you can, then go back to deadheading and mulching!

To see a nice little video of last year’s scarecrows visit YouTube. For a view of some of the scarecrows for 2011 go here. Enjoy!

The Singing Nuns and Priest of Santa Rosa Church


The Cambria High School Marching Band

Hope this Gentleman Stays for a While

"Wild Women"

Fall Means Changes in the Garden

"Tillie" the Labradoodle and Planter Boxes

For the last month or two I’ve been in maintenance mode in my garden. Lots of deadheading and watering. Inspiration for new planting has eluded me. Most likely this is because, according to official data, we got only four sunny days here in Cambria, in all of July and August. We really didn’t have a summer in the conventional sense of the word.

Also, another excuse coming, I’ve been crazy busy. The two little labradoodles got us out and about on the beautiful Fiscalini Ranch trails each day. The girls are becoming more civilized and we find them immensely entertaining. When not training dogs, I sat hunched over my computer updating my two websites. I ran into real technical problems with my other site Backyard Hencam. It took me several weeks to get it resolved. I’ve gotten around to writing articles for the Tribune and Cambrian but have neglected my little gardening blog. And it is the most fun of all! I get to tell you about my life in the garden and other such nonsense. So today I’ll update you on what has been happening in around my Cambrian garden.

Hollyhocks Still Coming on Strong

We’ve had a good amount of summer squash as well as zucchini. Their leaves are covered with powdery mildew now and will be removed any day. Pumpkins did really well. Surprising since it was so cool. Tomatoes are giving us tasty treats but they are smaller than in previous summers. We had an old Granny Smith apple tree that was attacked by aphids. We don’t spray our trees but I had to get out some insecticide for this one. The tree bore no fruit this year and what fruit it provided was damaged by the aphids. I missed those beautiful tart green apples. The other old apple tree ‘Beverly Hills’, is infected with incurable “fire blight” but gave us an abundant crop of fruit. I dried much of it in the dehydrator. This variety provides apples that delicious to eat, are considered “low chill” and make great applesauce needing little sugar. The Granny Smith are better for pies. They stay firm when baked.

Japanese Maples are Turning Colors

We got a fair amount of Santa Rosa plums and Asian pears. Our berries this year were outstanding! We’re still getting raspberries. My lettuce and kale are getting pretty tough. They’ll soon become “chicken treats”.  Yesterday I got out in the beautiful sunshine and planted two cool-season vegetables, beets and chard. Hopefully it’s not too late. I’d like them to get up to a few inches before Christmas. Then they’ll just sit there and meditate through the winter. In spring, they’ll take off and I’ll get some nice beets and greens next summer. At least that is the plan.

I’ll post some picture of my garden as it is now. You’ll be able to see what I need to do. Hopefully, I can get it cleaned up by winter then let it (and me) rest. Now I’ve got to get up out of this chair and get some photos taken before the sun gets too high. Cheers to all and happy fall gardening!

Growing a Giant Pumpkin? Maybe!

Unusual pumpkin-Could it be a giant?

Pumpkins are not supposed to do well in cool weather. But mine are going crazy this year. One of them is a variety that I don’t recognize. Could one of my saved seeds have gotten mixed up in my seed box? Could I have planted a “giant pumpkin” by mistake?

A couple of years ago, someone gave me several seeds in a plastic bag that was labeled “giant pumpkins”. I never planted the seeds because I was being pessimistic and thought I would lucky to get pumpkins of any size to grow in our coastal climate. But now, appearing in my small pumpkin patch, nestled among the rose trees, are the strangest looking pumpkins I’ve ever seen! The vine that is producing them is 20 feet long. The largest pumpkin growing is 12-14″  in diameter. It is larger that my regular pumpkins and lighter in color. It appears to have a thinner skin and is flattening out on one side. I’ve given it several turns so that it won’t become too deformed but in turning it, I may break it from its stem and prevent it from reaching its full potential so I am extremely careful.

When I first noticed this odd “giant” pumpkin, it was about the size of a cantaloupe. It resembled a cross between a large yellow crookneck and a pumpkin. I convinced myself that some cross pollination had taken place behind my back. I cut it off and baked it as I do small pumpkins, by cutting it in half and removing the seeds, then placing it face down on a cooking sheet and baking it for about an hour. I scooped out the “meat” after it was finished cooking, mashed it, added a little butter and salt and pepper. It was quite delicious!

I wish I had realized what this vine was going to produce. I would have followed some procedures to give it a chance to be a contest winner. There are some techniques to growing “bigger than big” pumpkins. You must let your vine have two or three pumpkins until they reach the size of a volley-ball. Then you must remove all but the fastest growing one! Put a piece of plywood or cedar under your selected fruit and protect it from critters and the hot sun. Feed your pumpkin a well-balanced fertilizer until your fruit is about 12″ and then cut back on nitrogen. Water is critical at this point! Competitive growers of giant pumpkins all have secret formulas for getting their pumpkins to reach 1200 pounds ! You must help your pumpkin get all the nourishment it can absorb. You must pinch off new baby pumpkins (ouch) and remove any new shoots the plant sends out.

There is an annual Giant Pumpkin Weigh-Off to be held at the Mission Plaza in San Luis Obispo on Oct. 20. There is no entry fee but you must complete an entry form to enter and to win any of the prizes. Entry forms are available from any of the Farm Supply stores. Too late for me this year, but perhaps you may have an entry worthy of a trophy!

Growing Pumpkins in a Cool Climate

Pumpkins are Turning in Late August

What a strange coastal summer we’ve had. It has been exceptionally cool with overcast in the mornings and breezy sunshine in the afternoons. The hens in the henhouse (see Backyard Hencam) have been happy and laying like crazy but my garden languishes; except for the summer squash and pumpkins.

I’ve always had pretty good luck with pumpkins here in cool Cambria. Pumpkins are said to need heat but I get a dozen or so each year, enough to give to grandchildren and make some pies for Thanksgiving. I cook a pumpkin, purée it, and freeze it for our Australian labradoodles to have on occasion. I’ve read that pumpkin is good for their digestion so I mix it into their food when their tummies are upset from eating something they shouldn’t have (which is more often that I like to recall).

This year I’ve got about a half-dozen big pumpkins that are starting to turn orange. I won’t harvest them until they have fully matured and have gained their beautiful rich color. Their skin needs to harden and their stems need to dry and shrivel before they are removed from the vine. Pumpkins do not sweeten after they have been harvested so it’s best to leave them on the vine for as long as possible.

The leaves of my pumpkin are beginning to get powdery mildew (like my summer squash leaves). I ignore it and remove the leaves when they get too infected. It doesn’t seem to affect the production of the pumpkin.

Pumpkins are considered a winter squash because they store well in the winter, not because they grow in the winter. Pumpkins need to be stored at temperatures under 60 degrees. They will lose some sugar as the winter progresses but can be good up to about six months.

If you don’t have a place to grow pumpkins be creative. I plant mine in my rose garden. The vines meander in and around the rose bushes and fill in space that would otherwise be wasted. Pumpkins are fun to grow and fun to eat. Fall is not fall without a few pumpkins in the garden.

Kale – Easy to Grow and Eat

Freshly picked red kale

You’d think I’d learn my lesson. Every spring I plant “mesclun” (pronounced mess-cloon). Mesclun is a mixture of lettuces and tender greens for use in salads. They do really well in our cool coastal climate and give me a variety of greens. Most mesclun seed packages contain the seeds of lettuce, arugula, endives, mustard, cresses, and escarole. This year I planted a mesclun package that had kale seeds in it. This has happened before but I’d forgotten how well kale grows here. It grew so large and fast that it pretty much obliterated the smaller greens.

Kale is packed with vitamins and minerals and can be put in salads or cooked. Some varieties have curly, frilly leaves and some are smooth. The seeds in this package were that of red kale.

Kale likes rich soil. Sow seeds in early spring about ½ inch deep and two feet apart. For a fall-winter crop, sow seeds in late September or early October while soil is still warm. Keep the soil moist. Thin plants to 1-½ feet apart.

Kale will keep growing for some time and not go to seed as quickly as mustard greens. Harvest outer leaves as needed for recipes. Young tender leaves are good in salads and older leaves are better cooked.

I cook kale like I cook mustard. Here is a simple and delicious recipe that I made last week.

Recipe for Sautéed Kale

Ingredients:

1 lb. kale

1 tablespoons olive oil

1 red onion thinly sliced

1 clove garlic

Pinch of dried hot red pepper flakes

1 tablespoon balsamic vinegar

¼ teaspoon salt

½ cup raisins, currants, or dried cranberries (optional)

Directions:

Cut off tough stems and the center rib of the chard leaf and discard. Cut leaves into 1-inch strips. Cook kale in a 6-quart pot with water, stirring occasionally, or steam in microwave for about 3 minutes just until tender. Drain in a colander.

Heat oil in a large heavy skillet over moderately high heat until hot but not smoking. Sauté onion, stirring occasionally, until softened (about 6 to 8 minutes). Add garlic and red pepper flakes and sauté, stirring, until garlic is fragrant (about 1 minute). Reduce heat to moderate, then add kale and raisins and cook, stirring occasionally, until heated through. Remove from heat and stir in vinegar, and salt.

I think you’ll enjoy this easy-to-prepare dish, whether or not you grow kale or buy it at the farmer’s market. I feed my extra kale to my hens and they love it. You can visit them at: backyard hencam. Perhaps you’ll find them eating my overgrown kale.